

As I mentioned in my last post Sarah and I recently went back to work on the bus after a two and a half week break for Christmas and New Years. What I didn’t mention is that we actually went back to having jobs. Shocking that two people on the interweb that own a skoolie and an adventure-themed blog would also have jobs, right? Well as it turns out, a month and a half long road trip across North America, rent at a beach condo in Florida, storage for a 38 foot bus and a major conversion to turn that old bus into a liveable space, has an uncanny ability to whittle down one’s savings account.
Sarah’s picked up work as a shift leader at a local grocery store and I had a very unique offer to train to become the Captain of a 72 foot, Gaff-rigged Schooner set up for tourist day trips in St. Augustine, FL. I used to consider myself an avid sailor and even lived aboard my own little sailboat for two years along the Southern US coast. I sailed the snot out of that little sloop and crewed on about a dozen other sailboats and by the end of it, when I finally moved on to big diesel passenger boats, I thought I was a damn fine sailor.
Fast forward, four years and about 14,000 nautical miles under the keel aboard big steel and aluminum power boats and practically no time actually sailing in that time. I figured I could just pick up my sailing career right where I left off. Turns out one really can get a bit rusty after a few years of not using a particular skill set. Also learning how to trip sails on a traditionally-rigged schooner in light and variable winds in a narrow channel subject to quite a bit of current presents one with quite a learning curve. The long time owner and full time captain, Captain John is luckily a great teacher and very patient. Coming aboard this boat and literally learning the ropes has been a blast. It’s been challenging but hugely rewarding and I’m really looking forward to finally getting cut loose with the boat and her excellent crew in the coming weeks.
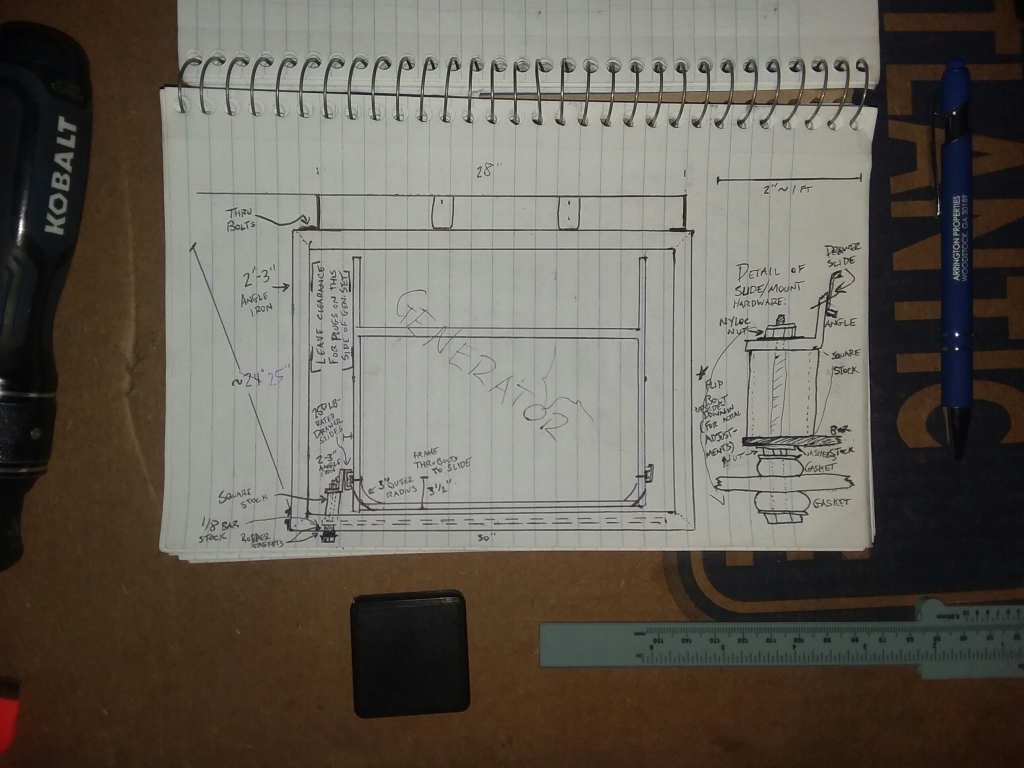
On to bus stuff! The Generator Mount: Finally after the last month of skteching, tinkering in my backroom, drawing up schematics, poking ineffectually around the bus, cutting, re-cutting and many random bus-related ideas popping into my head at 3:00 in the morning, things are finally rolling again and I have fleshed out a lot more of the gritty little details of the build. For one, how do I mount a 115 pound 4000 Watt utility generator on slides under a school bus?
Initially I just thought of bolting our generator directly to the underside of our floor with a few bolts and bushings but quickly realized I would still need to be able to fill the tank from the top, access the pull start on the side, plug in our house power and easily change and add oil. The whole thing also needed to be inside a weatherproof sound-proofing box to keep our little mechanical beast clean, dry, rust free and to quiet the noisy little beast so we could actually turn the thing on and hear ourselves think (and, you know, talk to each other and stuff). Suddenly my generator mount got a lot more complicated and a bit more expensive. Due to the design of the generator frame itself, I realized pretty quickly that the 250 lb-rated drawer slides I bought from Amazon would need to be mounted low on the generator frame. Also with vibration being a concern for sound-dampening, the generator and slides themselves needed to be isolated from the bus frame via big rubber bushings somehow; I also figured that these bushings would help reduce shock-loading on the generator frame and bus floor while bashing down pock-marked logging roads in the Yukon and Northern BC. So, the general idea is that I had to build a steel box frame, bolt that to the underside of the bus body, build a cradle that the generator would mount into via the heavy-duty drawer slides, then mount the cradle into the box frame with some hefty bolts and rubber bushings. The whole rig gets finished off with sheet metal sides, foam insulation, an air intake fan power by the generator itself, an exhaust port/exhaust extention/exterior car muffler and a big door panel chopped out of the side of the bus for access. Should be easy to use once built but to make it, I had to source and cut a lot of angle iron, buy a bunch of hardware and somehow learn to weld.
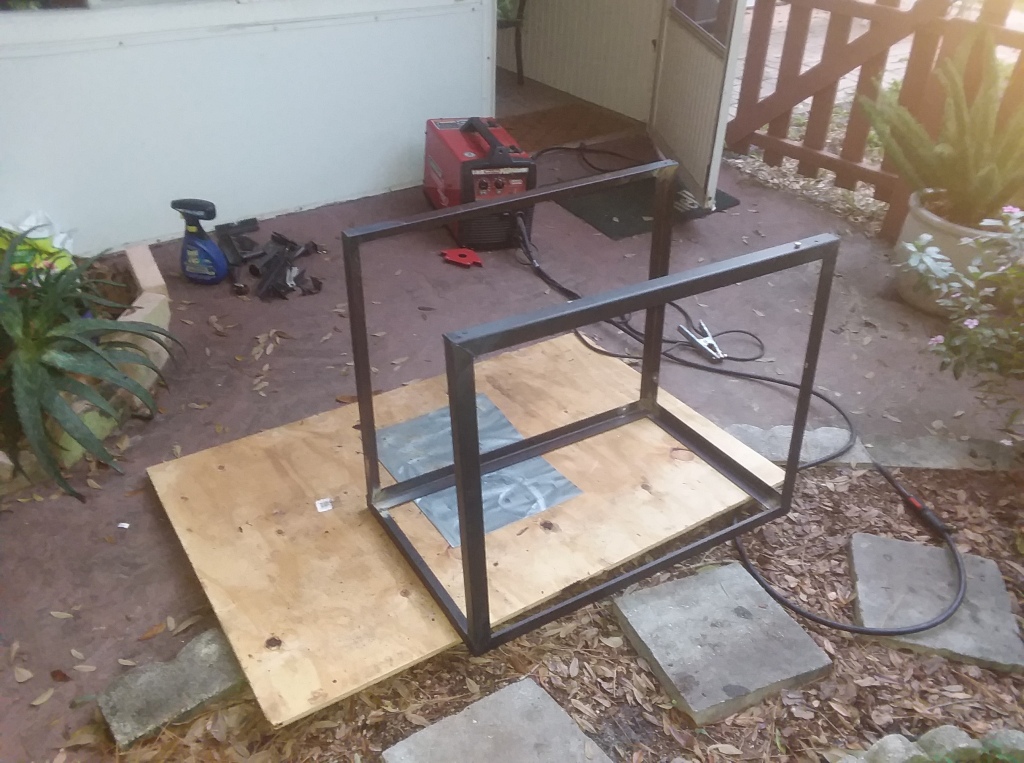
Steel isn’t exactly cheap if you buy it new. I searched for about a month for a supplier where I could get all of my 2-3″ angle iron but pretty consistently, my quotes were in the hundreds of dollars. Money was tight and I wasn’t even sure I could weld it together with any amount of success so I kept putting it off. Finally, last week, I had an epiphany (In reality, a memory from another skoolie owner’s blog I found several months ago): Bed Rails! Bed rails are perfectly abundant and a super cheap source for good, rust free angle iron! A trip to Goodwill and less that $45 later, I had two sets of twin bed rails and exactly what I needed to build my generator mount.
I re-measured my generator, drawer slides, available space under the bus, carefully considered adjustments to my blueprint, slapped on a $5 chop saw blade on the miter saw and was off to making a big fiery mess in the back garden.

Once all my bits were cut, I took my ever handy angle grinder, polished off most of the paint (I should’ve prepped my steel better, I got a lot of spatter, bubbles and generally ugly welds due to poor electrical connectivity when I first started), broke out my Dad’s loaner Lincoln Electric 140 HD MIG Welder with flux core wire and got to work making sparks. I don’t have a great place to work, essentially my whole shop worth of tools has to be mobile enough to put in a closet every night so I dropped a piece of free plywood on the ground in the garden, took some of my old ceiling sheet metal to use as a backer and tried to get the first side of the steel generator frame as square as I could with magnets, clamps and whatever I had lying around. I placed a couple tack welds to hold it together and improve the electrical connection through the piece, checked it’s square and layed down a bunch of welds. Repeat for the other half and tack the whole thing together. For a first time project, I was pretty happy with the results:
I’m headed to the bus later to dry fit the mount, measure for the access door cut out and drill some mounting holes in the bus body.
The Windows: voiding and repositioning emergency escapes and frames
A school bus has a ton of windows. We really did’t need to make sure sixty-six kindergarteners have a nice view of their ride to school anymore so at least 5 needed to come out and get covered with sheet metal. Luckily we had a ton of the stuff left over from our gutted ceiling so the supplies were handy and free but how to do it? I’m not really supposed to be welding in my storage yard and moreover, I’m not a great welder by any stretch of the imagination. After pulling out a window and it’s frame, cutting a window-hole sized piece of sheet metal, I realized I could just remove the glass in the frame and press the sheet metal in place. Add 6 sheet metal screws to hold the sheet metal to the old window frame, rebed with caulk, and we’re done. I’ve finished 3 in this way already and am about to move onto the other two later today. Simple, cheap and so far it seems really sturdy and watertight!

While I’ve been working inside the bus, gutting things, I’ve really come to love the simplicity and effectiveness of the Blue Bird Standard window emergency escape hatches. I can open all four in less time than it takes to open two normal windows, they let in a ton of fresh air and because they hinge at the top, are very effective at keeping the bus dry even when it starts to rain and they’re left open. I couldn’t resist not keeping this awesome feature and incorporating them into our new floor plan. So one of our aft hatches got moved up into our living room area and the other aft hatch is getting moved forward by one window bay to fit between the toilet and shower. I wanted to put them both in the bedroom (for fresh air and the terrifying prospect of having to bail out in the middle of the night) but unfortunately, the three aft windows are either a size too big (34″ rather than 27″, wtf?) or are partially blocked by a structural piece of sheet metal (far aft window).
That’s all the rambling I have time for today, thanks for following our work! Now I’m off to go drill some holes in an old school bus!

Double Eh (that’s for Austin Arrington for the uninitiated), Sarah, and Charlie! We love how you you three roll through and evolve with all that a true adventure offers up! Excited to see you back in NM or maybe we need a sail with you in the mean time?!? Proud to have you in our lives. Love to you three! p&z
LikeLiked by 1 person
Pablo! Thank You! We can’t wait to roll through NM again this fall or winter once we finish the bus and head up to the Pacific Northwest and spend some quality time with you two amazing people again!
LikeLike